The Elimination of all that is unnecessary to achieve a Dream
By Thomas J. Elpel
We are very goal-oriented in Western culture, and we often count our successes by how much we accomplish. Eastern cultures can be very goal-oriented as well, but sometimes with a very different approach. While a westerner sits on his laurels at the end of the day and adds up what he did, an easterner might sit on his laurels and add up what he eliminated having to do.
As a simple analogy, you might say that a western artist does sculpture with clay, assembling an entire work piece by piece, while an eastern artist does sculpture in stone, eliminating everything that is not part of the final goal. It is two fundamentally different approaches to a similar point. Yet, there is still more to this analogy than that. The western sculptor may shape clay all day long, but the eastern sculptor sits in front of his stone and meditates on it. Then, at the end of the day he picks up his chisel and hammer and makes one strategic hit, revealing all at once a whole portion of the art!
Our approach to achieving our dreams was more the eastern approach than the western one. With this approach my wife and I were able to completely build and pay for our dream home on a combined annual income averaging only $10,000 to $12,000 per year.
I pretty much grew up in the pages of the old Mother Earth News magazine. All through high-school I collected and read and reread every issue of Mother that I could find, accumulating a wealth of ideas and dreaming of how to someday assemble those ideas into a way of life. Over the years there were a number of articles on the Japanese farmer Masanobu Fukuoka, and his "no-plowing, no-fertilizing, no-weeding, no-pesticides, do-nothing method of natural farming". His approach was essentially to research, meditate, and eliminate all the unnecessary work in growing his crops. I did not really understand Fukuoka's approach at the time, but I connected with it on an subconscious level. In many ways I was already doing a similar thing--by picking out ideas that would allow me to eliminate all the obstacles on the way to my dreams.
In Zen it has been said that, "Reverence is the elimination of all that is unnecessary." In high-school I envisioned a life in harmony and reverence with nature, and researched ways to eliminate all that was in my way of that goal.
Financing the Dream
In high-school the teachers were always telling us that we had to study hard so that we could find good-paying careers as adults. I found it irritating that they would paint such a dismal picture of the future. I did not realize at the time that most of my classmates considered it normal. I had a lot of Dreams in life, and the idea of getting a job and working for the next forty years just scared the heck out of me. Thus I was highly motivated to find a no-job path to success.
Renee and I started dating during our senior year of high-school and were already drawing house plans by time we graduated in June of 1986. We both tried different things for two years, then did a 500 mile walk across Montana in 1988. With that experience we decided we could do anything, so we set a wedding date, got jobs and started saving money. Our financial strategy was simple.
Most people rent a house, have a lot of expenses, work real hard, and maybe put 5% of their income away towards their dreams. But you have to work an awfully long time to get anywhere that way. We took the opposite approach and lived on 5% of our incomes while we put 95% away into savings. We got jobs leading stone-age wilderness expeditions, so it was pretty easy to keep expenses down. We had a sizable nest-egg by the time we married in 1989, so we bought land, pitched a tent, and started building. Living in a tent and cooking rice and beans over the campfire allowed us to continue putting virtually all of our income into our Dream. Today, with no house payment, and low energy bills, we are able to eliminate the need for jobs through much of the year.
Designing our Home
Our art teacher in high-school told us that art is never finished, that you just have to pick a point to stop working on it. The same is true of architecture. You can never completely "perfect" a set of blue prints, but the more time you meditate on it, the better off you will be.
The most important point to understand is that everything happens "on paper". How much a house costs, how it looks, how comfortable it is, how energy-efficient it is--all these things occur on paper before you pick up even one tool. A little additional time in the planning stage can save you tens of thousands of dollars in construction and maintenance. That is time well spent.
Too often, however, builders simply draw a few boxes on a piece of paper, scoot them around until they are reasonably satisfied with the layout, and start building. The result is houses end up being more costly and less energy-efficient than they should be. Proper planning can make the difference between whether or not you get the house you really want.
Starting in high-school, we spent four years researching and designing our home. Even so, we were still polishing details in our plans when we started building. We simply reached a point where we had to put down the pencil and "pick up the hammer" (actually a cement mixer).
Our approach to designing was simple. We stuck to the basics. We protected the house on the north and east sides by building into the hill. We covered the south face of the house with glass, and created the greenhouse as a sort of an "airlock" between the main part of the house and the outside.
People expect a solar home to cost a lot more, but it does not have to. The main difference between a solar and non-solar home is that the solar home has most of the windows on one side. There are no more materials involved; it just takes longer to come up with a blueprint that aesthetically works inside and outside. Similarly, solar homes often have some fancy heat storage system, such as a wall of masonry, or a stack of water jugs just inches behind a wall of glass, or perhaps a gravel heat sink under the house with a system of pipes and blowers to store and retrieve the warmth. These are extras that are tacked onto a house, and there was no way we could afford such extravagance with our income-so we eliminated them as unnecessary. But we needed walls and floors, so we simply built the walls of stone, and the floors of tiled concrete, to get the advantages of thermal mass without sinking money into a specialized heat system. To eliminate the need for ducting, we put our wood stove in the middle of the house and created an open floor-plan for easy air circulation.
Everywhere in a house there are ways to eliminate complexity. For instance, when builders pour a concrete wall for an earth-bermed house they often build an insulated frame wall inside the house. This becomes the equivalent of building two walls--an extravagance we could not afford. So we used a sand-texture paint to give the concrete the appearance of a plastered-adobe wall, and put rigid insulation outside, against the wall, held in place by dirt "siding". Putting the insulation on the outside kept the thermal mass on the inside. The west side of the house was added on last, and is the only part of the main level that is truly exposed to the weather. Thus it is the only part of the house with insulation sandwiched in the wall.
By simply arranging our building materials in an energy-efficient layout we were able to create a warm house without throwing a lot of money into sophisticated materials or insulation. This also enabled us to eliminate the need for thousands of dollars of central heating. As it is, our main heat source is our wood cook-stove in the kitchen.
We chose the wood stove not as a matter of economics, but as part of our quality of life. I grew up around my Grandma's wood stove, and simply would not settle for anything else.) We have no backup heat when we leave, but the house temperature gradually drops to 50 degrees (F) and stays there.
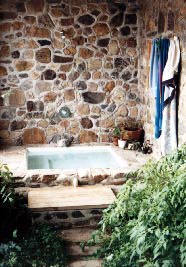
Remarkably, we can cook all day on our wood stove right through the hottest parts of summer, without cooking ourselves out of the house. Creating an open loft above the kitchen area allows the heat to flow straight up, so we just let it out the upstairs door. We evacuate the heat from the greenhouse the same way. Incidentally, our water system runs through the fire box of the stove, giving us near-scalding water at the faucet, at no extra cost. On sunny days we get "automatic" hot water from our solar panel, also free. In the winter time we initially fill our hot tub with free hot water from the tap, then pay only a few dollars more per month to keep it hot with an electric element.
Our house may look expensive, but the reality is that we only have about $10 a square foot into it. Yet I have seen some million dollar homes that looked like junk. Appearance, like energy efficiency, is more a product of design than of cost. You can take the same materials and arrange them poorly or arrange them well. This is where art comes into architecture. We both had a background in art from high-school, but it does not take much artistic skill to design a good-looking house; it just takes time. Believe me, our first house plans were pretty funky, but after four years they started looking pretty good. You may not have much artistic skill to begin with, but if you picked up a pencil and sketched your cat or dog for the next four years then you would probably get pretty good at that too. We developed a sense of architecture by just doing it, and now we are much faster at it. Most importantly, however, the investment of time allowed us to meditate on our plans, so we could eliminate extra work and materials and save many thousands of dollars.
The Building Process
Our house was well researched and planned, yet there were still many unknowns. In particular, neither of us really had any building experience to give us a basis in reality. Our house plan was more of a house hypothesis. It seemed like a good idea, but would it work? There was only one way to find out. One thing we learned walking across Montana is that the only way to get anywhere is to take it one step at a time and see what comes next.
A previous owner once started development on the land we bought, so there was already a concrete slab on site, measuring approximately 30 X 95 feet. Coincidentally, our tentative house plans fit one section of the slab, and its footings, to within a couple feet in each direction. We threw out our house plans and grabbed a box of crayons. After a couple days of gesturing and imagining, we had a final, life-sized plan, with every wall out-lined right on the slab.
But first we buried 1,100 feet of plastic pipe from the spring and cistern to the house, put up a new temporary power pole, and had the phone company install a telephone in our tent. Then we had to set forms and pour a concrete wall on the north and east sides of the house, where it would later be back-filled with ten feet of earth. Our first masonry experience consisted of three cement trucks and 17 yards of concrete!
Doing our slip-formed stone walls after that was considerably less intense. We used Steve Parsons' book, Stone Houses: A Design and Construction Handbook (out of print), as our primary guide in this department. We set forms along the crayon lines on the slab and started building. Through our research we had identified the slip-form technique as an easy, low-skill way for amateurs like us to put together straight, good-looking stone walls. We used simple forms, mostly 2 feet tall and 8 feet long, framed with 2 x 4's and faced with plywood. These are set on each side of the wall, wire-tied together, and braced apart. Stones are placed inside the forms with a good face against the plywood, and concrete is poured behind them. The walls can be faced with stone on one side, leaving a concrete wall on the other side, or faced on both sides. Most of our walls are faced on both sides. Reinforcing steel is placed horizontally and vertically throughout the concrete.
All along the way we strived to eliminate costs. We salvaged old lumber from the dump. We used old steel cables, barbed wire, and steel fence posts for much of our rebar. Our rocks were free from the local hills and fields. We did not have much money, but we found a lot of resources. Eventually the house became my full time project, and Renee earned the money to support us. Every time we had any money we would spend it all on some big project. Then she would go back to work, and I would go salvage a few boards somewhere and keep building. If we had the money all at once then I am sure the house would have ended up costing twice as much. But every time the money ran out we simply became more resourceful. Building without money causes a person to meditate a bit longer, to redesign individual projects to fit the available materials.
During our second summer we put up the logs for the upper story. I might emphasize that it is generally not advisable to switch building materials in this kind of a project. It requires twice as many tools and twice as much knowledge. But for us this was the equivalent of a college education, and we did not have enough knowledge at this point to be able to do anything else with our lives anyway, so we had time on our hands. Fortunately, my inlaws attended a log-building class, and learned about an exciting new low-skill, low-cost method of working with logs. I peeled all of our logs in a few days using a tool called a Log Wizard. It is essentially a planar blade that mounts on the end of a chainsaw. With the help of my inlaws, we put up the main part of the log work in about ten days. Later we helped them to build their 3000+ square foot log home.
This method of log building we used went fast because it was so simple. It eliminated a lot of the complexities involved in the process. We did not do any notching, and we did very little to make the logs fit together. In fact, there were 2 inch gaps between the logs in some places, yet that is okay with this method. We drilled holes and pounded 1/2 inch rebar through each set of logs, every four feet along the walls, as well as through the corners. This rebar schiscabobbing holds the logs together without notching, and amazingly even prevents the logs from settling at all, so you can safely put in doors and windows without any special engineering. The spaces between the logs are later filled with strips of insulation and chinked with standard masonry mortar. Galvanized nails are first pounded in every three inches along the logs to give something for the mortar to anchor itself on. Vertical poles are set in place to support the ridge pole, so it does not put any weight on the walls. The roof is pretty much standard construction, with 2 x 10 rafters, R-30 fiberglass batts, skip sheathing, steel roofing. The ceiling is sheet-rocked.
Construction usually proceeded slowly throughout the process, due to our chronic lack of money. We moved into the house that second year, although with no doors or windows and no insulation in the roof. When we were both home we took turns around the wood cook-stove, with one of us sitting on the oven door, and the other standing behind the stove. Our frigid Montana winter stopped about three feet from the stove. Renee said she was warmer when she was at work, leading teenagers on wilderness expeditions for three weeks at a time in Idaho. This might all seem a little rough, but I later realized that we saved at least $150,000 in interest payments by eliminating the need for a loan. That is not a bad wage for a couple years of camping out! We kept working on the house, and by spring it was quite survivable; by the next winter it was downright livable. Eventually we even got an indoor toilet, and later built a 600 square foot addition.
In Perspective
Economically, we were able to boost the value of our $10,000 income up to about $50,000 or $60,000 a year, tax free. We did this by adding value to the resources we purchased, and even more by avoiding interest payments on a loan.
Also, building our own home was the equivalent of a college education for us. Our house was our diploma, built and paid for. We had few marketable skills when we started, but many skills by the time we finished. We even built and sold another stone house along the way, and we plan to do more.
Most importantly, however, we got our Dream home, and the freedom to decide each day what we want to do. That freedom is important because we have a lot of interests. We are heavily immersed in the primitive, or stone-age skills, which we research, practice, publish, and teach through our own wilderness programs. That in itself is like going to school for a couple degrees--it takes a lot of time. We also research and publish on environmental economics, and we are working on plan to be able to "prefab" stone houses, to make them economical for more people to own. Each of these areas of interest requires that we have the freedom to sit back and meditate, to take the time to find out what complexities we can eliminate, so we can pick up the chisel at the end of the day and make our one strategic hit, to achieve our goals smoothly and easily.
For all the benefits we gained out of building our own home, I would still not recommend it to every person. Building a home has a way of becoming an education and a career. Do not try building a house only because you think you will save money; it does not work that way. Focus directly on your Dreams and make them your reality. Do that and you will always be successful.
I've just read your article "Building a House on Limited Means," and placed an order for your Living Homes book. I can't wait to receive it. My boyfriend, Jim, and I have almost identical aspirations for our own lives (right down to building a house into a hill, heating our water with the warmth of a woodstove, and eliminating the need for a 40hr/week job). Reading your article, I could hardly believe that there was someone out there that had similar dreams, and, better yet, made them come true! I knew it was possible!!
Thanks for the inspiration!!!
--Erin Mulcahy
Hello Tom.
My wife and I have been pouring over your Slipform Stone Masonry Video and Living Homes book. Do you have more details on your home listed anywhere? The home we've been designing is very much like yours. The biggest difference is that our "wall o' windows" on the south side didn't have the greenhouse feature. The other difference is that we have a bathroom off the Master Bedroom where you have the opening between the kitchen area and the upstairs. The more I look at and study your floorplan the more I like what I see. Do you happen to have a floor plan with the room dimensions available for study. If not, could you tell me if the floor plan on page 10 of Living Homes (4th Edition) is to scale? If so, how about the inside dimensions for a couple of the rooms and I'll figure out the rest.
Thank you in advance.
Hugh & Myra
Hugh & Myra,
I am honored that you like our house plans so much. The drawings in the book are approximately to scale. One inch is equal to approximately 11.3 feet. East-west the house is about 63 feet long, outside-to-outside.
That sounds good to have a bathroom upstairs where we have the loft. I like our loft a lot, although I think we could get all the benefits of it with about 1/4 of the area. The rest of the space could be put to some use.
There are a few other modifications you might think about, or that we might change if we were to build this house again. First, our bathroom is exceedingly small by most people's standards. It works for us, since we are not the type to spend hours in there staring at the mirror or doing make-up. However, we did put a vanity in the girl's bedroom for that purpose. It would be a good idea to dedicate more space to your main level bathroom. If nothing else, at least it makes the house more salable. A few more built-in closets would also be a good idea.
Another modification I would suggest is to move the fireplace, if you have one. We like to pull the chairs up close and put our feet up on the hearth, but that blocks the pathway across the room to the door. It might have been better to put the fireplace on the wall against the bathroom, except that our breaker box was right there.
Also note that our living room and my office are quite dark, although we actually like it that way. We like the living room dark for watching TV, and I like my office dark for working on the computer. Even without much outside light I usually have my light off in here.
You would be very welcome to send copies of your plans as they come along. I would take a quick look over them to see if I notice anything you might not have thought of. I hope this has been helpful!


 DirtCheapBuilder.com
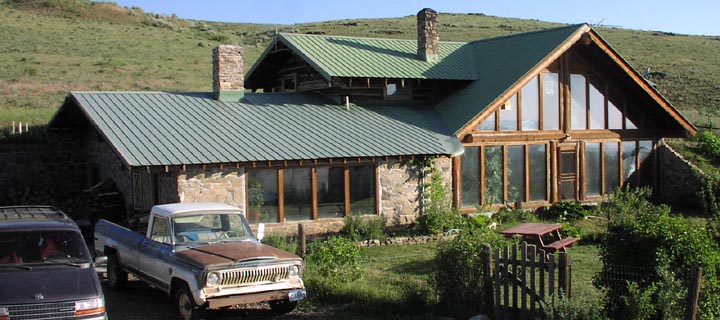
 Financing the Dream
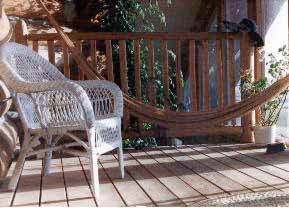 Designing our Home
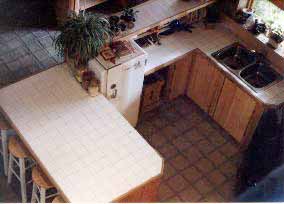 Everywhere in a house there are ways to eliminate complexity. For instance, when builders pour a concrete wall for an earth-bermed house they often build an insulated frame wall inside the house. This becomes the equivalent of building two walls--an extravagance we could not afford. So we used a sand-texture paint to give the concrete the appearance of a plastered-adobe wall, and put rigid insulation outside, against the wall, held in place by dirt "siding". Putting the insulation on the outside kept the thermal mass on the inside. The west side of the house was added on last, and is the only part of the main level that is truly exposed to the weather. Thus it is the only part of the house with insulation sandwiched in the wall.
 The Building Process
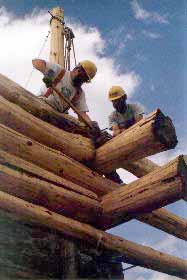 During our second summer we put up the logs for the upper story. I might emphasize that it is generally not advisable to switch building materials in this kind of a project. It requires twice as many tools and twice as much knowledge. But for us this was the equivalent of a college education, and we did not have enough knowledge at this point to be able to do anything else with our lives anyway, so we had time on our hands. Fortunately, my inlaws attended a log-building class, and learned about an exciting new low-skill, low-cost method of working with logs. I peeled all of our logs in a few days using a tool called a Log Wizard. It is essentially a planar blade that mounts on the end of a chainsaw. With the help of my inlaws, we put up the main part of the log work in about ten days. Later we helped them to build their 3000+ square foot log home.